 |
||||||||||||
| Home |
|
Products For Sale |
FAQs, Tips, Manuals |
Referral List |
|
Photo Gallery |
|
Links |
|
Contact Us |
|
|
||||||||||||||||||
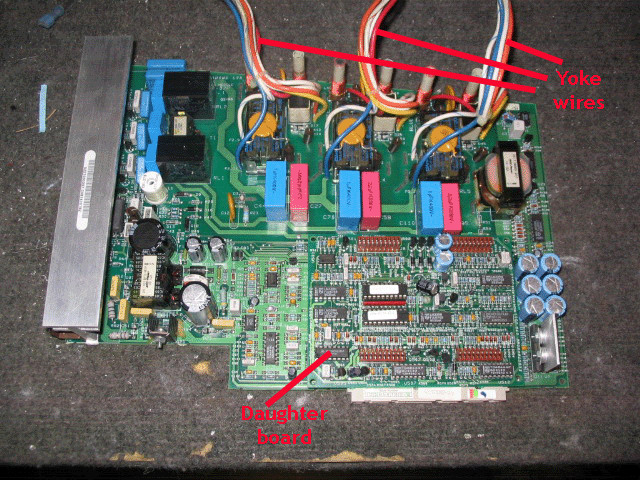
Horizontal output board Here is an overview of the HDM or horizontal deflection/output module. This board sits vertically between the blue and green CRTs. It contains the circuitry for the horizontal deflection, and controls the center square raster shift in a horizontal direction. The thick group of wires connect to each deflection yoke for each CRT. The white connectors pull apart to flip the image in an H direction. Make sure you only disconnect the yoke wires after the set has been turned off and unplugged for at least a minute to discharge all high voltages in this area.
There is a small daughter board that fits onto the main HDM. There is a small plastic screw that holds the daughter board in place. Undo the screw, and the daughter board pulls straight out of the multi-pin connectors holding it in place. It is common for the HDM to develop bad module connections either on the main board or between the daughter board and the main board. This will cause an H fail LED to come on on the back of the unit and usually causes a ‘no picture’ condition. It is also possible for a no picture condition to occur due to a bad connection, but the H fail LED on the back of the set will not come on. Simply pull out the main HDM and take the daughter board off and reseat it. Slide the HDM back into it’s slot a few times to clean the module contacts. Other failures on the HDM are usually caused by a high voltage arc somewhere in the set, usually caused by pinhole leaks in the HV leads going to the tubes. There are any number of components that can fail on the HDM, if you get an H fail LED and reseating the modules does not cure the problem, contact us for servicing of this board.
|
|
|||||||||||||||||
© Copyright CurtPalme.com. All Rights Reserved. |

 Electrohome Marquee
Series
